

Turkey in the Varoma is a revelation and we are loving it so much! We orignally had to cook a turkey just for a photo and then as always, I had a hair brained idea. Why not try steaming this massive turkey first? So we did. It was so successful that I knew I had to share it with Insiders via video. And I quickly called Debbie from TM Essentials to ask her for a discount on the V-stacker for the month of December. Hello...the best turkey ever. Thanks to the V-stacker from TM Essentials you can officially steam and THEN roast your turkey. (Don't you just love our proud turkey cookin' granny?)

Steaming accomplishes a couple of things for your bird. It partly cooks it of course, and very often the danger of roasting a turkey for as long as it requires to be fully cooked results in dry meat. Never nice. So steaming provides moisture as it cooks, leaving the meat tender and still moist. It isn't fully cooked after steaming but then transferring it to your oven will finish the job and leave you with a delicious crispy skin, something that is also helped by the initial steaming phase. (You're welcome!)
Here are my Turkey Loving Tips for the best Turkey this Christmas (and any time to be honest...that would be Thanksgiving to all my American friends and family!)
- Thawing time on frozen turkeys will vary based on size. The largest size turkey you can fit into the V-stacker is a 5kg, so based on that, it will take 3-4 days in the fridge from fully frozen. Do not thaw a turkey anywhere other than in the fridge for the sake of a salmonella free festive frenzy!
- When the time arrives to cook your bird, take the now-thawed turkey out of the fridge and set it on a rack at room temperature for an hour to take the chill off and dry out the skin. (This can be the same rack you plan to roast your turkey on; there’s no need to dirty another dish.) Your roasting rack should allow the bottom of the turkey to sit at or just below the top of the pan). If you have no roasting rack, you can sub in a cooling rack in a large shallow roasting tray.
- Don't stuff the cavity. As much as I have previously always done so, for the sake of this recipe, leave the cavity of the turkey completely empty, apart from a good rubbing of the garlic herb butter as explained. This will help it cook a lot quicker and more evenly.
- Baste your turkey (once it hits the oven) every 30 minutes with plenty of the compound butter. You can thank me later. Delish!
- Getting the internal temperature of the breast meat correct is the true key to perfect turkey. The magic temperature you are aiming for is 70°C (or approx 163°F). Bear in mind the internal temperature of the meat will rise as the bird rests, which is also vital to not having dry meat. I like to let my turkey rest for at least 30 minutes and to be honest, you can easily use that amount of time up in just messing around with the gravy and other fussing that a Christmas dinner requires. So longer is not a problem as the meat stays hot for quite a long time.
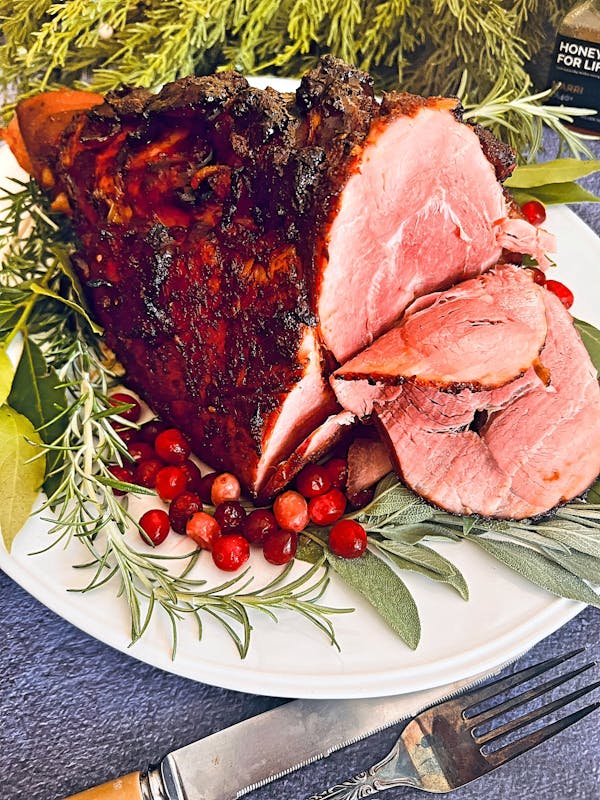
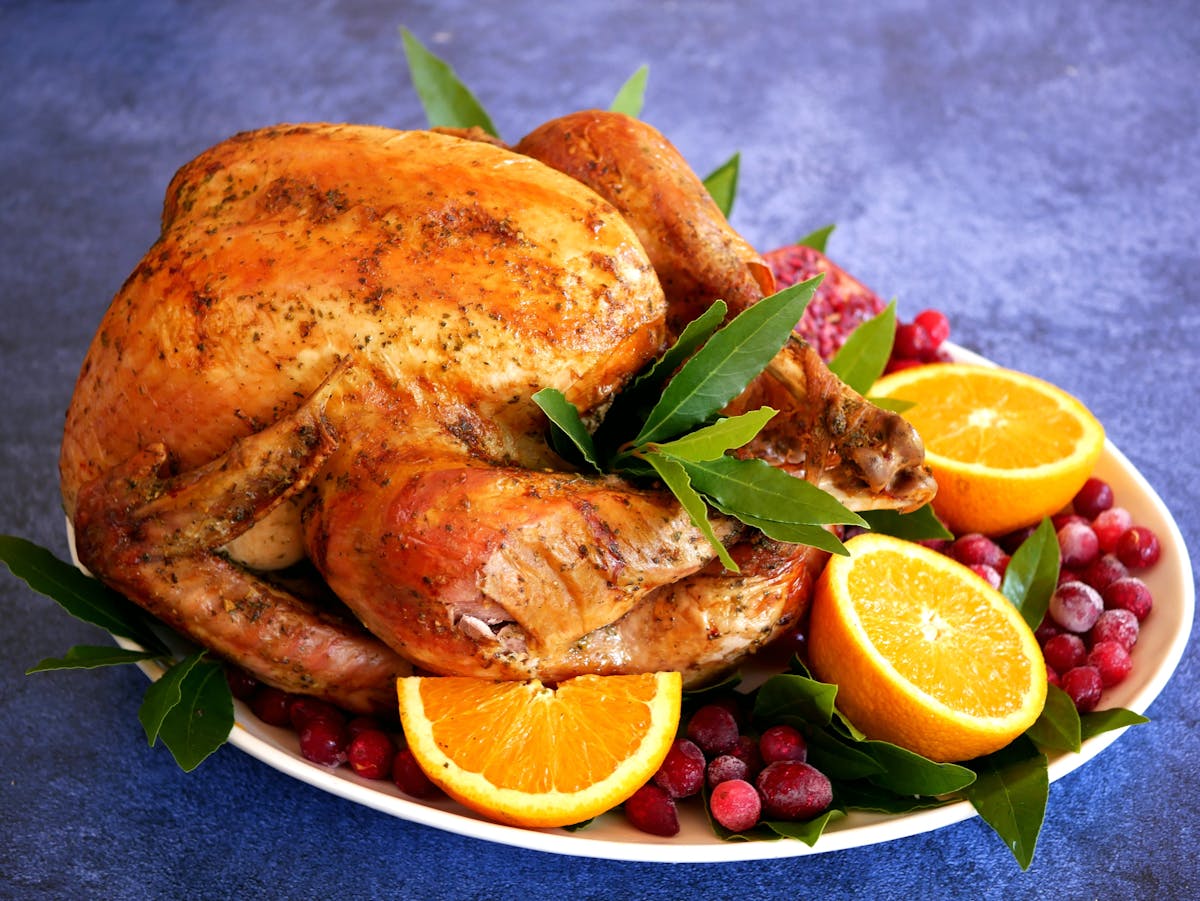
I think the best thing to bear in mind is that the recipe works. You need to trust it and if all else fails, cook it slightly longer than you think rather than not long enough. This will ensure you have a lovely coloured centrepiece for your table, garnish it with sliced oranges, bay leaves, cranberries (the frozen ones look amazing as they look a little frosted) and potentially pomegranates.
Make the gravy as instructed and I think you will agree, this is one of the best recipes yet! Merry Christmas!
If you enjoyed this recipe, we invite you to come join our FREE TRIAL on the Insider Club to have extra Thermomixery each and every month! #recipesthatwork #youcandoit
Are you on Instagram, Facebook, Pinterest? Never miss another thing in the test kitchen when you follow us.
Please join our mailing list HERE to have recipe updates delivered to your inbox weekly and don't forget we are on YouTube.
Our newest course, (FREE to Insiders) Shelf Control helps you sort out your pantry and fridge!
We have an amazing Lazy Sourdough Bakery course available to do at your own pace online.
Our delicious frosty course, The Whole Scoop Ice Cream course is churning now!
Need
-
The Turkey
- 1 x 5 Kilo whole turkey, defrosted
- 2-3 cloves garlic
- 1 Handful mixed herb leaves
- 225 Grams butter BUY
- Water for steaming
- 3-4 celery stalks
- 2-3 carrots
- 2 onions, peeled and halved
- Liquid stock or wine as needed
- pink salt flakes and cracked black pepper to taste BUY
- 1 Batch Turkey Gravy as part of this entire process, they are connected Recipe
Do
- 1
Make sure your turkey is fully defrosted and that the cavity is empty. You may need to remove the giblets and neck. Back in the day I used to boil these up and create a stock to use in my stuffing, but this turkey requires no stuffing. (See notes)
- 2
Dry the turkey well with a paper towel, inside and out. Place it into the Varoma dish and then add the V-stacker making sure all of the bird is inside and that the lid will sit properly on top. Remove the turkey and place it onto a flat work surface.
- 3
Make your compound butter by adding all the garlic and herbs, salt and pepper to the Thermomix bowl. Chop 2 sec/speed 8. Add the butter, and blend 10 sec/speed 6, scrape into a bowl and fill the Thermomix bowl with water up to the 1L mark.
- 4
Rub the turkey all over generously with the herb butter. Inside and out. Under its wings, everywhere. You will have left over butter, this is OK, you will use it throughout the roasting process as well.
- 5
Place the turkey upside down in the Varoma with the V-stacker and set into place. Steam 45 min/100°C/Speed 3. Once completed, turn the turkey right side up and steam for a further 45 min/100°C/speed 3, checking the water level, though we had no issues with this at all.
- 6
Meanwhile, roughly chop all the vegetables, and place into the bottom of your roasting pan. If you don't have a rack in the roasting pan you will have to put the turkey directly on top of the cut veggies, though it is preferable to use a rack.
- 7
Preheat oven to 180°C and place a rack on the lowest position.
- 8
When the turkey has finished steaming, remove from the Varoma straight on top of the veggies. Brush with more of the herb butter. It will melt on contact so no need to melt it first.
- 9
Season generously with salt and pepper. Pour a little liquid stock or white wine around the veggies, without touching the skin of the turkey.
- 10
Cook in the oven for a minimum of 90 minutes, basting every 30 minutes with more of the butter.
- 11
Test the internal temperature of the breast meat if you have a meat thermometer. I use a digital probe thermometer that is quite expensive but very accurate, that I also use for chocolate tempering and candy making, or testing oil temps for deep frying. If you spend the money on a high quality product it will do everything.
- 12
Make the gravy as directed while you rest the turkey. Use all of the veggies that you have cooked underneath the bird with all of the butter and drippings included. Just amazing.
- 13
Serve with plenty of gravy, cranberry jelly and loads of your favourite side dishes. Merry merry Turkey!