The Ultimate Guide to Cooking Turkey with your Thermomix
The Ultimate Guide to Cooking Turkey with your Thermomix
Wondering how to get that perfect turkey for Thanksgiving or Friendsgiving or Christmas? You know, the one with irresistibly crispy skin, juicy white and dark meat, and all cooked to perfection in line with food safety standards? Look no further! With your Thermomix by your side, we're here to guide you through every step – from thawing to seasoning and cooking. Follow along to make this year’s turkey your best one yet!
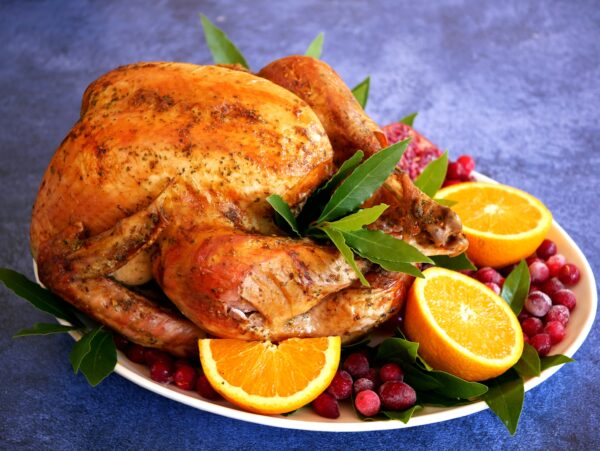
I do love Thanksgiving and with our connections to the USA still, we often throw a pretty low key turkey party for family. But I also love turkey at Christmas time and this idea came to me when we were looking to have a Christmas photo shoot for the Insider Club and what is more iconically Christmas than a beautiful turkey on a platter? (See the photo result below!)

For some, turkey is the star of the holiday table; for others, it’s just an excuse to pour on the gravy! Either way, mastering the art of cooking a turkey to golden perfection on the outside and juicy deliciousness on the inside is the key to pleasing everyone. With a little help from your Thermomix and the Maxi Steam Extender from Alyce Alexandra, you'll have all the tips and tricks to make sure your turkey shines this season!
Here’s your step-by-step guide to get that turkey oven-ready, starting from the thawing process all the way to seasoning, steaming in the Thermomix, and finishing in the oven for a golden, juicy bird!
1. Thawing the Turkey
Plan ahead: A frozen turkey needs 24 hours for every 2kg of weight to fully thaw in the fridge. For example, a 6kg turkey requires three days in the fridge.
Keep it chilled: Place the turkey on a tray to catch any drips and keep it in the coldest part of the fridge, ideally at or below 4°C (40°F), to avoid bacterial growth.
2. Brining the Turkey (Optional but highly recommended for juiciness!)
Wet brine: Submerge the thawed turkey in a saltwater solution (1 cup of salt per 4L of water) for 12-24 hours in the fridge. Add aromatics like garlic, rosemary, and bay leaves to enhance flavour.
Dry brine: Rub salt (around 1 tablespoon per kg) all over the turkey, then let it sit uncovered in the fridge for 24-48 hours. This method allows the skin to dry, resulting in a crispier finish. However if you are going to steam the turkey as we describe below, there is no point doing this process.
3. Seasoning the Turkey
Pat dry: Remove the turkey from the brine and pat it completely dry. Moisture on the skin will prevent it from crisping.
Herb butter: Mix softened butter with chopped herbs, garlic, and a pinch of salt. Spread it under the skin of the breast and drumsticks for maximum flavor.
External seasoning: Rub the outside with EVOO and sprinkle with salt, pepper, and any other spices you love. This will help with browning in the oven.
4. Steaming the Turkey in the Thermomix
Prepare the Thermomix: Fill the Thermomix bowl with 1.2L of water and set the Varoma in place. You will need the Maxi Steam Extender for this recipe.
Steam the turkey: For no larger than a 5kg turkey, place it into the Varoma dish with extender inserted. Steam on Varoma for about 10 minutes per 500g to partially cook the bird, locking in juices and tenderness. For example, a 4-5kg turkey would need approximately 80 minutes. See my exact recipe for the timings to perfection!
Rest and cool: Let the turkey cool slightly after steaming to make it easier to handle when moving to the oven. Also dry the skin, for a crispier result.
5. Oven Roasting the Turkey
Preheat the oven: Set the oven to 220°C (425°F) for a quick initial browning, then reduce to 180°C (350°F) for even roasting.
Roasting time: Allow about 15 minutes per 500g at 180°C for a fully cooked turkey. For example, a 4kg bird would need about 2 hours.
Internal temperature: Use a meat thermometer to check the internal temperature. For safety, the thickest part of the breast should reach 74°C (165°F), while the thigh should hit 80°C (175°F) for maximum juiciness.
6. Resting the Turkey
Let it rest: After removing from the oven, tent the turkey loosely with foil and allow it to rest for at least 20 minutes. This lets the juices redistribute, making each slice tender and juicy. It will actually stay hot (it increases in temp for the first 15 minutes or so) for around 90 minutes, so no rush.
7. Carve and Serve
Carve with care to showcase your beautifully cooked bird and serve it with pride – crisp skin, juicy meat, and all!
Now that you have the perfect turkey under control, get organised with the gravy, and all the delicious sides...
See our suggestions below. OH, and for the full video access on this process, please join my Insider Club. It is packed with great info, videos, recipes, ebooks and more.
Join us for all things Christmix!
More from Thermomix for Christmas

Tenina Holder
Tenina Holder is a wife, mother of five and grandmother of eight, who started cooking in the olden days before Thermomix was even a thing.
Tenina has become the premium go to source for all Thermomix expertise and of course fresh and easy recipes that work. Her cooking classes and foodie trips are sold out in literally hours, her cookbooks appear on the Australian best seller lists and her social reach is in the millions. Her Insider Club is the most fun you can have with a Thermomix and you really should join her! She believes chocolate, butter and salt are health foods. Her food positivity mantra is, eat everything, just not all at once!


