Sponge Cake or is it?


This ridiculously realistic sponge cake is so convincing you’ll hesitate before taking a bite. ANd it could get the kids doing the dishes!
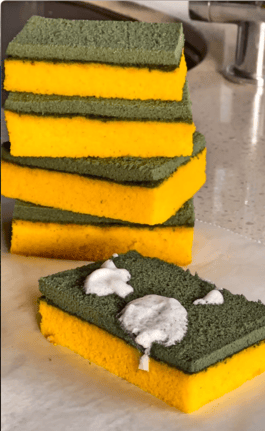
If you’ve ever watched those “Is It Cake?” videos yelling at your screen in disbelief, welcome to your next baking obsession. This hyper-realistic sponge cake looks exactly like a humble kitchen dish sponge… right down to the texture, colour and terrifyingly believable details. It’s the kind of cake that makes people do a double take before nervously asking, “Wait… can you actually eat that?”
I had so many crazy reactions when I posted the video, especially as I tuck into the cake at the end...watch and see!
Anyway, thankfully yes, you absolutely can eat it. Beneath the suspiciously sponge-like exterior is delicious cake, and the accompanying video shows exactly how the illusion comes together. Equal parts hilarious, impressive and slightly unsettling, this is the ultimate prank bake for parties, birthdays or anyone who loves a bit of edible chaos in the kitchen.

Need
- 1 Batch Classic Sponge Cake batter (not cooked) Recipe
- 20 Drops doTERRA lemon oil BUY
- green and yellow food colouring (for the green I played around mixing neon blue, navy blue, yellow and black)
- 2 Tablespoons apricot jam
- green and yellow cleaning sponge. For comparison.
- 2 egg whites
-
The Dirty Plate Ideas
- cookie crumbs, jam, melted chocolate, cream, maple syrup, whipped meringue etc
Do
- 1
Preheat oven to 170°C. Grease and line 2 slice tins approximately 30cm x 18cm.
- 2
To the sponge batter, add 20 drops of lemon oil and stir to combine. Pour out roughly one third of the batter into a bowl. Add green food colouring to that bowl and stir gently until combined and it's the correct green.
- 3
To the remaining batter in the Thermomix bowl add yellow food colouring. Combine 12 sec/Interval. Finishing with a spatula.
- 4
Start with a small amount of food colouring. You can always add more but you can't take it out.
- 5
Pour green batter in one tin and yellow in the other. Spread it out evenly.
- 6
Bake for 13 minutes, then take out the green cake. Leave the yellow one in fo 4 more minutes as it's deeper it will take a little longer. Cool for 5 minutes.
- 7
Very carefully tip the cakes out of the tins on to a cooling rack and peel off baking paper. Cool completely.
- 8
Trim the top of the yellow cake so it is level.
- 9
Place jam in a small bowl and add a little hot water to thin it out. stir and squish any lumps.
- 10
Pour jam over yellow cake, spread evenly right to the edges.
- 11
Place green cake on top. Cover with baking paper then place a heavy wooden board on top. This will help "glue" it together. Leave it like that for at least 20 minutes. (If the board isn't very heavy, add something on top to weigh it down a bit).
- 12
Using a real sponge as a guide, cut the cake into rectangles. A serrated large bread knife works well. Then you can trim here and there until you're happy with them.
- 13
To make them look more realistic, we roughed up the green tops with a knife.
- 14
When you're ready to serve, make the soapy bubbles. Place the egg whites in a clean and dry Thermomix bowl. Insert Butterfly. Whip 10 sec/Butterfly/speed 3. Check bubbles, continue whipping a few seconds at a time until it looks like soapy bubbles.
- 15
Add bubbles randomly to the sponges. Serve on a "dirty" plate for full effect.


Bree is a mum who has always loved cooking and baking and became a big Tenina fan when she got her first Thermomix. She was on the very first foodie trip as a customer and hasn't looked back, working for Tenina for over 10 years as a recipe tester and developer, branching out into video master for all of Tenina's lives! She still runs her baking business, creating amazing cakes and macarons for her customer list.